Laravel Lumen RESTful API tutorial
In this post we will show you Laravel Lumen RESTful API tutorial, hear for Laravel Lumen RESTful API tutorial we will give you demo and example for implement.
Lumen is a “small scale structure” based over Laravel’s parts made by Taylor Otwell who is likewise in charge of Laravel.
It has been intended to create smaller scale administrations like little application or web benefit. It has been produced for speed. In Lumen Symfony’s Routing segment which has been utilized by Laravel supplanted by FastRoute to upgrade execution. You can check more cool highlights here.
In this post, we’ll actualize a straightforward RESTful API. This API in light of putting away and indicating book data.
Installing Lumen
We’ll introduce lumen through Composer, So the primary check is arranger introduced or not? Utilizing following charge in your terminal or order incite.
composer
If you able to see some composer commands feel free to proceed otherwise take a look this easy composer post.
After installing composer, we’ll change our directory to server root folder.
cd /var/www/html
Now tell composer to create a lumen project “lumen_rest_ce” from “laravel/lumen” package (packagist.org).
composer create-project laravel/lumen lumen_rest_ce
Composer will create a folder “lumen_rest_ce” and install all files of lumen including dependency.
You can check all artisan command which are available in Lumen by
php artisan
Now run Lumen on your local server and open 127.0.0.1:8000 in your browser
php artisan serve

And it will show you above image on your browser.
Configuration
Now create a database in your phpmyadmin or other mysql client and edit the credential “lumen_rest_ce/.env.example” file to “lumen_rest_ce/.env”
DB_CONNECTION=mysql
DB_HOST=127.0.0.1
DB_DATABASE=lumen_rest_ce
DB_USERNAME=root
DB_PASSWORD=your_password
Now open “lumen_rest_ce/bootstrap/app.php” and uncomment following lines.
Dotenv::load(__DIR__.'/../');

$app->withFacades();

$app->withEloquent();
First we are fetching credential from .env file and then we’ll use Facade class and Elequent ORM.
Migration
Its time to write our database schema for migration, we’ll create table “books” which has total 6 columns. id (int & auto incremented), title ( varchar), author (varchar), isbn (varchar) , created_at (timestamp) and updated_at (timestamp).
We’ll use migration which is revision manager for the database like svn or git.
In your terminal/command prompt write
php artisan make:migration create_books_table –create=books
It will create a migration file under “database/migration”. Open the file, you’ll find “CreateBooksTable” class has been created, this class has two method one is “up” where we’ll write our table schema, another is “down”, where we’ll drop our table which will call at the time of rollback.
Now edit this migration file like this:
use Illuminate\Database\Schema\Blueprint;
use Illuminate\Database\Migrations\Migration;

class CreateBooksTable extends Migration {

    /**
     * Run the migrations.
     *
     * @return void
     */
    public function up()
    {
        Schema::create('books', function(Blueprint $table)
        {
            $table->increments('id');
            $table->string('title');
            $table->string('author');
            $table->string('isbn');
            $table->timestamps();
        });
    }

    /**
     * Reverse the migrations.
     *
     * @return void
     */
    public function down()
    {
        Schema::drop('books');
    }
}
To create the table in your database, we have to migrate or run our migration file
php artisan migrate
A table has been created in your database.
Model
Now create a Book model under “app/Book.php” and use book table instance.
<?php namespace App;

use Illuminate\Database\Eloquent\Model;

class Book extends Model
{
    protected $fillable = ['title', 'author', 'isbn'];
}
?>
Also create a BookController.php under “app/Http/Controllers”.
<?php

namespace App\Http\Controllers;

use App\Book;
use App\Http\Controllers\Controller;
use Illuminate\Http\Request;


class BookController extends Controller{
 .....
 .....
 .....
 .....
 .....
}
?>
Route
Now open “app/Http/routes.php” , you’ll file one routed already exists.
$app->get('/', function() use ($app) {
We need write some more routes and corresponding Controller method in order to create RESTful API.
Method For RESTful API in Lumen Laravel Micro Framework
| Method | Url | Controler@method | |
|---|---|---|---|
| GET | {id} | BookController@getbook | Fetch Book By id |
| GET | BookController@index | All Books | |
| POST | BookController@createBook | Create a book record | |
| DELETE | {id} | BookController@deleteBook | Delete Book By id |
| PUT | {id} | BookController@updateBook | Update Book By id |
we have appended api/v1 (ie, version v1) in all routes. It’s a good practice in order to create web services.
So now our routes.php will be like
$app->get('/', function() use ($app) {
    return "Lumen RESTful API By CoderExample (https://coderexample.com)";
});

$app->get('api/v1/book','App\Http\Controllers\BookController@index');

$app->get('api/v1/book/{id}','App\Http\Controllers\BookController@getbook');

$app->post('api/v1/book','App\Http\Controllers\BookController@createBook');

$app->put('api/v1/book/{id}','App\Http\Controllers\BookController@updateBook');

$app->delete('api/v1/book/{id}','App\Http\Controllers\BookController@deleteBook');
Yes we can group this routes according to prefix and namespaces , So we dont have to append “api/v1” in every routes or write “App\Http\Controllers”.
Here is is our modified routes.php
$app->get('/', function() use ($app) {
    return "Lumen RESTful API By CoderExample (https://coderexample.com)";
});

$app->group(['prefix' => 'api/v1','namespace' => 'App\Http\Controllers'], function($app)
{
    $app->get('book','BookController@index');

    $app->get('book/{id}','BookController@getbook');

    $app->post('book','BookController@createBook');

    $app->put('book/{id}','BookController@updateBook');

    $app->delete('book/{id}','BookController@deleteBook');
});
Controller
Now edit BookController.php and according to routes implement those method.
Here is our Modified BookController.php
<?php

namespace App\Http\Controllers;

use App\Book;
use App\Http\Controllers\Controller;
use Illuminate\Http\Request;


class BookController extends Controller{


    public function index(){

        $Books  = Book::all();

        return response()->json($Books);

    }

    public function getBook($id){

        $Book  = Book::find($id);

        return response()->json($Book);
    }

    public function createBook(Request $request){

        $Book = Book::create($request->all());

        return response()->json($Book);

    }

    public function deleteBook($id){
        $Book  = Book::find($id);
        $Book->delete();

        return response()->json('deleted');
    }

    public function updateBook(Request $request,$id){
        $Book  = Book::find($id);
        $Book->title = $request->input('title');
        $Book->author = $request->input('author');
        $Book->isbn = $request->input('isbn');
        $Book->save();

        return response()->json($Book);
    }

}
Testing
Now your API is ready. Its time tests the app. For testing, you can use CURL.
curl -I

curl -v -H "Accept:applicationhttps://www.onlinecode.org/json"

curl -i -X POST -H "Content-Type:applicationhttps://www.onlinecode.org/json"  -d '{"title":"Test Title","author":"test author","isbn":"12345"}'

curl -v -H "Content-Type:applicationhttps://www.onlinecode.org/json" -X PUT  -d '{"title":"Test updated title","author":"test upadted author","isbn":"1234567"}'

curl -i -X DELETE
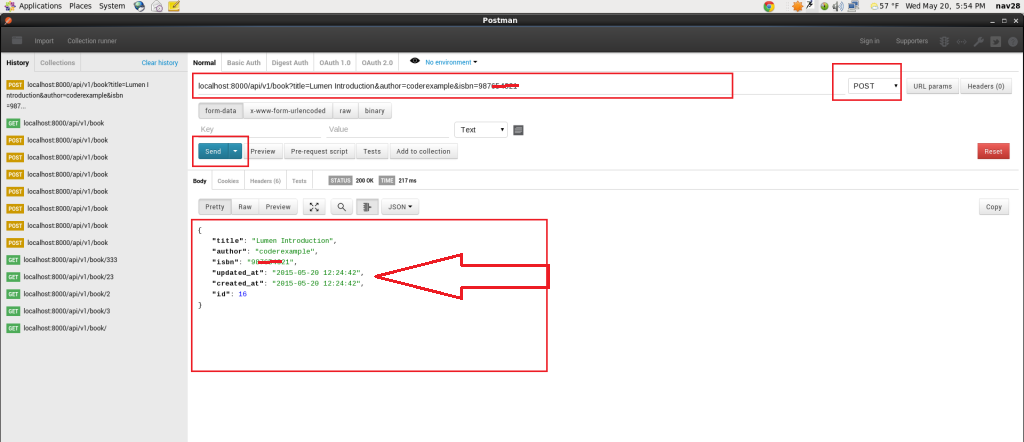
I found a chrome extension “POSTMAN” to test RESTful apis easy way.
After installing “POSTMAN” open it typing “chrome://apps/” in your chrome address bar.
Conclusion
There’s nothing more to it. Our fundamental API is tried at this point. Despite the fact that it’s not generation prepared case, for creation we have to consider verification, approval, blunder dealing with and substantially more other stuff.
Source Code is accessible in Github simply clone/download into your server and run “arranger introduce” to download all conditions.
In coderexample we’ll be posting some additionally fascinating post about RESTful API in Lumen Laravel Micro Framework. stay in contact and spread the post if conceivable. Don’t hesitate to remark your questions.
Hope this code and post will helped you for implement Laravel Lumen RESTful API tutorial. if you need any help or any feedback give it in comment section or you have good idea about this post you can give it comment section. Your comment will help us for help you more and improve onlincode. we will give you this type of more interesting post in featured also so, For more interesting post and code Keep reading our blogs onlincode.org