Magento 2 create widget with Magento 2 CMS-how to create create widget using Magento 2
In this post we will show you how to create Magento 2 create widget. hear we will give you coede for create new Magento 2 create widget.
Right here is that ways we may comply with this a way to Magento 2 create widget?:
File setup/Our module
Widget declaration File
Let’s create new model file
Let’s create new block file
Create new template file
Previously on our general Tutorial of a way to use Magento 2 CMS (Content Management System), we tend to have already got an honest time with basic information of exploitation this powerful feature. currently we’ll go down thoroughly with the Magento two widget within it.
Magento 2 create widget can permit the positioning administrator to insert admin contact info like full name, age, gender….etc. And we’ll produce Magento two widget via widget Instance or add within the editor section of CMS Page => Block. We’ll use common field sorts in Magento 2 create widget like text and dropdown.
I assume that you’ll conversant in the structure of the Magento 2 module. therefore let’s start:
First, let’s take a glance at the most structure that we’ll ought to implement for our Magento 2 create widget.
1 File setup/Our module
2 Widget declaration File
3 let’s create new model file
4 let’s create new block file
5 create new template file
app/code/onlinecode/CustomsWidget/etc/module.xml: file setup of our module
app/code/onlinecode/CustomsWidget/etc/widget.xml: a widget declaration file accustomed declare widget info and parameters.
File setup/Our module
First we want create the module setup file. produce file app/code/onlinecode/CustomsWidget/etc/module.xml and paste the subsequent contents therein file. we’ve got used onlinecode as our module vendor Name and CustomsWidget as our module name.
<?xml version="1.0"?>
<config xmlns:xsi="http://www.w3.org/2001/XMLSchema-instance" xsi:noNamespaceSchemaLocation="../../../../../lib/internal/Magento/Framework/Module/etc/module.xsd">
	<module name="onlinecode_CustomsWidget" setup_version="1.0.0">
	</module>
</config>
Widget declaration File
Create the widget file app/code/onlinecode/CustomsWidget/etc/widget.xml with content
<?xml version="1.0" encoding="UTF-8"?>

<widgets xmlns:xsi="http://www.w3.org/2001/XMLSchema-instance" xsi:noNamespaceSchemaLocation="../../../Magento/Widget/etc/widget.xsd">
	<widget id="onlinecode_CustomsWidget" class="onlinecode\CustomsWidget\Block\Widget\ContactInformations">
		<!-- parameter title -->
		<label translate="true">Contact Informations Widget</label>
		<description>Widget in Magento2</description>
		<parameters>
			<!-- parameter fullname and url -->
			<parameter name="fullname" xsi:type="https://snudifo26.fr/?big=magento" visible="true" sort_order="0" >
				<!-- pass Name -->
				<label translate="true">Full Name</label>
			</parameter>
			<!-- parameter Age -->
			<parameter name="age" xsi:type="text" visible="true" sort_order="10" >
				<!-- pass Age -->
				<label translate="true">Age</label>
			</parameter>
			<!-- parameter gender -->
			<parameter name="gender" xsi:type="select" source_model="onlinecode\CustomsWidget\Model\Config\Source\Gender" visible="true" sort_order="10" >
				<!-- pass Gender -->
				<label translate="true">Gender</label>
			</parameter>
		</parameters>
	</widget>
</widgets>
The first code for Magento 2 create widget ::
Declare our widget with the distinctive identification is onlinecode_CustomsWidget and also the category attribute is employed to map to widget file app/code/onlinecode/CustomCode/Block/Widget/ContactInformations.php
The field description can show description, introduce concerning module once created.
We need to declare all the choice of module within the sphere tag “parameters”
And the source_model attribute maps to the model file app/code/onlinecode/CustomsWidget/Model/Config/Source/Gender.php, wherever we’ll get our choices for the drop-down
And then, let’s produce new model file
app/code/onlinecode/CustomsWidget/Model/Config/Source/Gender.php
<?php
namespace Magestore\CustomWidget\Model\Config\Source;
// class  Gender
class Gender implements \Magento\Framework\Option\ArrayInterface
{
	// pass value
    public function toOptionArray()
    {
        return [
			['value' => 'male', 'label' => __('Male')],
			['value' => 'female', 'label' => __('Female')]
		];
    }
}
Next, let’s produce new block file
onlinecode\CustomsWidget\Block\Widget\ContactInformations that is asserted on top of code. during this file, we tend to assign custom example file inside _toHtml() methodology
<?php
namespace Magestore\CustomWidget\Block\Widget;

class ContactInformations extends \Magento\Framework\View\Element\Template implements \Magento\Widget\Block\BlockInterface
{
	// pass widget for function
	public function _toHtml()
    {
		// pass phtml name
    	$this->setTemplate('widget/contact_informations.phtml');
    }
}
Finally, produce new template file
onlinecode\CustomsWidget\view\frontend\widget\contact_informations.phtml – which will show all widget data on website.
<?php
$get_fullname = $this->getData('fullname');
$get_age = $this->getData('age');
$get_gender = $this->getData('gender');
?>
<!-- ul and li for gender, name -->
<ul>
	<?php if($get_fullname){ ?>
	<li><?php echo $get_fullname ?></li>
	<?php } ?>
	<?php if($get_age){ ?>
	<li><?php echo $get_age ?></li>
	<?php } ?>
	<?php if($get_gender){ ?>
	<li>
		<?php if($get_gender){
			echo __('Male');
		}else{
			echo __('Female');
		} ?>
	</li>
	<?php } ?>
</ul>
Now, we would like clear all the caches from the backend of Magento or delete folder var/cache(manually clear cache).
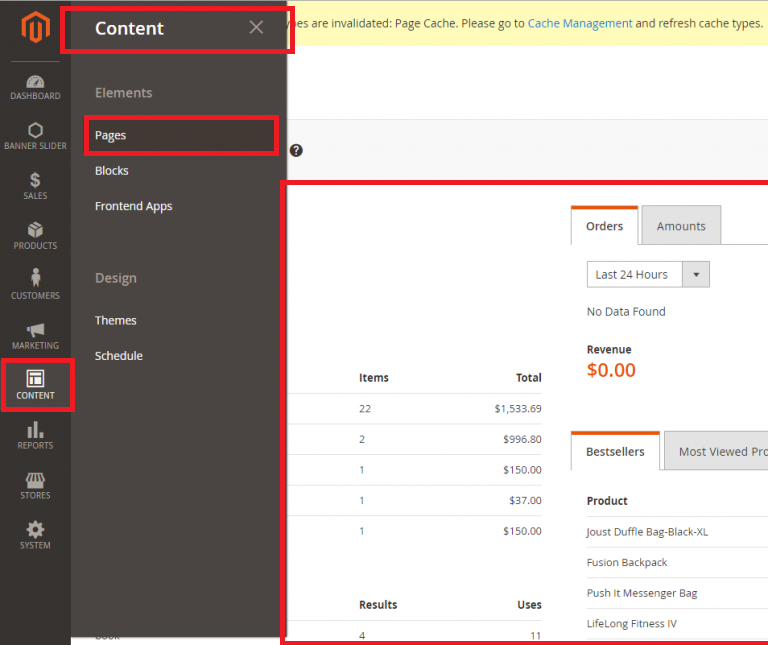
After that, head to Administrator Page => Content => Pages and add a replacement Page exploitation Add New page button, then click widget icon in Content Tab and we would like fill info for all field.
Save CMS page and head to the side of page to envision your widget.
You also like How To Call Static Block On CMC Page